Recording Data
PhysioLabXR’s recording interface lets you record multi-stream data with synchronized timestamps from various sources, for example, EEG and screen capturing from your experiment.
Supported File Formats
The platform supports various data formats to best fit your donwstream pipeline:
.dats (dictionary of array and timestamps): PhysioLabXR’s native data format, which is a binary format that stores data in a compact way. This format is optimized for quick serialization during a recording session. It can take a while to load back. If you will use Python for downstream analysis, we recommend using the pickle format instead.
.p (pickle): Python’s native data format. This format is optimized for quick serialization and deserialization. It is recommended if you will use Python for downstream analysis.
.m (MATLAB): MATLAB’s native data format. It is recommended if you will use MATLAB for downstream analysis.
.csv (comma-separated values): A text-based data format. Not best for saving a large amount of data, but it is human-readable and can be easily imported to other software.
.xdf (Extensible Data Format): A data format often used for physiological data, compatible with many software packages and analysis tools.
What is saved
Regardless of the data format, for all streams, PhysioLabXR saves data by each frame and the time when it captured that frame. When loaded back, if you are in Python, the data is returned as a dictionary of arrays and timestamps. The keys of the dictionary are the stream names. The values are a tuple of (data, timestamps). If you are in MATLAB, the data is returned as a struct with the same fields.
Learn From a Simple Example How to Record Data
In this example, we will record two data streams: a randomly generated stream and screen capturing.
Create a Dummy Stream
First, make sure you have the following packages installed in your Python environment:
pylsl
numpy
You can install them with pip install pylsl numpy, or if you use a conda environment, you can install them with
conda install -c conda-forge pylsl numpy.
We will create a dummy stream to record. Create a new python file, put in the following snippet.
1 2 3 4 5 6 7 8 9 10 11 12 13 14 15 16 17 18 19 20 21 22 23 24 25 26 27 28 29 30 31 32 33 34 35 36 37 38 39 40 41 42 43 44 45 46 47 48 49 50 51 52 53 54 55 56 57 58 59 60 61 | |
Now run the script in your terminal with a command like python LSLExampleOutlet.py. The script will start an LSL
stream with stream name ‘Dummy-8Chan’ and stream type ‘EEG’. The stream will generate random data with 8 channels and
a sampling rate of 250 Hz. The stream will keep running until you stop the script.
Add the streams to be recorded
1. In the main window, navigate to the stream tab located in the main window. In the Add Stream widget,
type in ‘Dummy-8Chan’, the name of the stream we created in the previous step. Press the Add button or
press Enter on your keyboard to add the stream.
2. We will add an video stream capturing your computer’s display. Now create a new stream by starting to type ‘monitor 0’. PhysioLabXR uses this name for screen capturing. The current version only supports capturing the main display if multiple displays are in use.
Note
This setup, a physiological stream and a screen capturing stream is a good example of what needs to be recorded in a typical experiment. You can add more streams if you have more data sources.
2. In the same tab, you should see two stream widgets now ‘Dummy-8Chan’ and ‘monitor 0’
with some information about the streams. There’s no start/stop button for the screen capturing because it’s always on.
You should see  at the bottom of the ‘Dummy-8Chan’ widget, meaning this stream is available on the
network. Press the
at the bottom of the ‘Dummy-8Chan’ widget, meaning this stream is available on the
network. Press the  button under ‘Dummy-8Chan’ stream to start receive
the stream.
button under ‘Dummy-8Chan’ stream to start receive
the stream.
Note
If the bubble is red, it means the stream is not available on the network. Make sure the dummy stream is running by checking the steps in the previous section Create a Dummy Stream.
Record the data
3. Now navigate to the recording tab located on the upper left corner in the main window.
(Optional) In the recording tab, click the recording options button,
you can modify the directory to which you want to store your data and the file format you want to store your data in.
4. Click Start recording button, the app will start recording the streams. At the bottom right corner,
you can see the recording
duration and file size as they increase.
Click
Stop Recordingbutton, the app will stop recording and store the recorded data to the path you specified.
Note
Loading .p, .xdf, and .mat are faster than .dats and .csv files. Recording video as .csv files are not recommended, as it takes a long time and the recorded file can be very large. See Supported File Formats for more details.
Now you can open the recording directory (you can open it from the context menu file/Show Recordings) to see the recorded file.
If you are using recorded file
You can use the load functions from PhysioLabXR, first install the pip package pip install PhysioLabXR
And simply import the load function, here is an example .. code-block:: python
from physiolabxr.utils.user_utils import stream_in
data = stream_in(‘path/to/dats/file’)
Advanced
.dats serialization and eviction interval
The recording is enabled by a serialization interface (RNStream) optimized for data with timestamps from multiple sources (i.e., EEG, eyetracking and video recorded simultaneously)
Recording files is created by RealityNavigation uses .dats file format. .dats (dictionary of array and timestamps) is a binary file format used by RealityNavitaion to log the recorded data. The structure of .dats is shown in the figure below
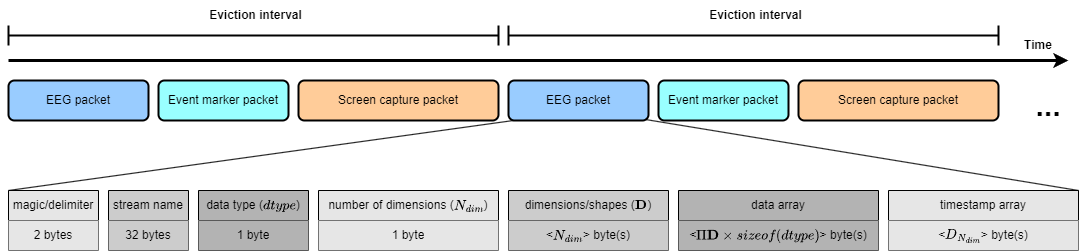
The file content is first segmented by eviction intervals. Within each interval, each type-length- value (TLV) packet contains the data for individual streams. The figure shows the anatomy of a TLV packet. Starting with a delimiter sequence called magic, the packet contains the data array and timestamps preceded by meta information: stream name, data type, number of dimensions, and the shape of the data. When loading .dats back, the loader uses the dimension information to determine the number of bytes to read as data and timestamp
Once recording starts, all the data streams are routed to a specialized buffer. The buffer’s content is retained in the host’s memory until the eviction interval is hit. Default at one second, the eviction interval controls how often we offload the buffer to the disk. When the data throughput are high, it is important to evict the buffer in time to prevent out-of-memory. User may adjust the eviction interval in the settings to optimize for their use case. During an eviction, each stream’s data and timestamps is appended to the file as a TLV packet